
Cropping sequence simulations (rotations)
Two monsoon rice crops (TAus – TAman)
In this exercise you will simulate two rice crops grown during the monsoon period. TAus rice is transplanted at the start of the wet season in June and followed by the a TAman crop in late August.
- Open the previous simulation Rice single season as a template. (C:\APSIM_workshop\Rice single season.apsim)
- Use “Save as” to create a copy of this file in the c:\APSIM_workshop\ directory. Name this simulation Rotations.
- Make a copy of Transplanted_paddy_rice by dragging it onto the Simulations node.
- Rename the copy to Rice-Rice.
- Select the Micromet node in paddock and delete (this is not required in these exercises)
- Select your soil (silt) for editing and change the starting soil water to 10% full (Evenly distributed)
- Select the Manager -> Rice-Transplant Aman rule to edit: Enter sowing window START: 1-Aug.
Enter sowing window END: 1-Aug.
Cultivar: BR23.
Duration of seedbed: 25.
Number of plants on hills: 2.
Number of hills: 25.
Number of plants per seedbed: 1000. (Plants/m2)
Fertilizer type: urea_N.
Amount of fertilizer at transplant: 100. - Select the Manager -> ‘Pond_depth’ rule to edit: Name of your soil module: Silt.
Start date of ponding: 15-Apr.
End date of ponding: 30-Oct.
Maximum depth of pond: 150.
Minimum depth of pond: 50.
Enable irrigation: yes.
Start date for irrigation: 15-May.
End date for irrigation: 30-Oct.
Max number of irrigations: 6. - Select the Manager -> Rice-Transplant Aus rule to edit: Enter sowing window START: 15-Apr.
Enter sowing window END: 15-Apr.
Cultivar: BR3.
Duration of seedbed: 30.
Number of plants on hills: 2.
Number of hills: 25.
Number of plants per seedbead: 1000.
Fertilizer type: urea_N.
Amount of fertilizer at transplant: 30. - Run the Rice-Rice simulation.
Graph date (X axis) vs total_biomass and rice_yield (Y axis). ( Hint: Use your XY Chart from the previous simulation)
Change the ‘title’ of your graph by renaming your ‘XY Chart’ to a more siutable name. (Hint: TAus-TAman rice (biomass and yield))
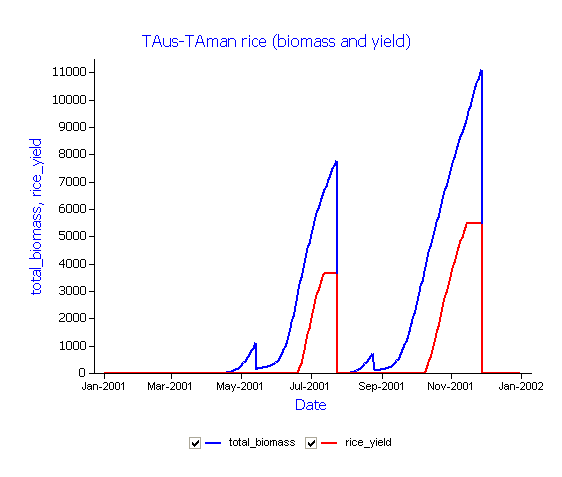
In the above simulation two rice varieties have been selected for their duration to maturity (Medium: BR23 ~119 DAE and Medium short: BR3 ~100 DAE) which enabled two rice crops to be planted during the wetter months of the local monsoon season. Selecting the appropriate variety (duration to maturity) is an important factor in constructing any crop rotation or cropping sequence and can effect the outcome of any long-term cropping sequence scenario. The previous simulations have only considered fixed sowing dates. Under dryland conditions the opportunity to sow a crop may rely on a rainfall event due to the unavailability of irrigation. A planting window (window of opportunity) can be defined in the manager with sowing triggered on meeting a specific condition such as rainfall (ie. 20mm over 3 days) or level of soil water (ie. ESW > 100mm).
Adding a dry season crop (ie. wheat) into the rotation
The previous example demonstrated a simple crop rotation or sequence of two wet season rice crops. In this exercise you will replace the early rice crop with a dry season crop (ie. wheat) sown into a full profile in mid November following the TAman rice harvest.
- Make a copy of ‘Rice-Rice’ by dragging it onto the ‘Simulations’ node.
- Rename the copy to Rice-wheat.
- Select clock and change the start and end dates for the simulation: Start date: 1/06/2001 End date: 31/05/2002
- Select the Manager -> Rice-Transplant Aus rule and delete:
- Select the Manager -> Rice-Transplant Aman rule to edit: Enter sowing window START: 15-Jul.
Enter sowing window END: 15-Jul.
Cultivar: BR23.
Duration of seedbed: 25.
Number of plants on hills: 2.
Number of hills: 25.
Number of plants per seedbead: 1000.
Fertilizer type: urea_N.
Amount of fertilizer at transplant: 50. - From the “Standard Toolbox” select “Crops (wheat)” and drag onto the paddock node. (You may want to reorder wheat to below the rice component)
- From the Standard Toolbox select “management” -> “Manager (common tasks)” -> (Sow using a variable rule) and drag onto the manager folder in your ‘paddock’.
- Select Manager folder -> Sow using a variable rule to edit:
Enter sowing window START: 1-Dec.
Enter sowing window END: 1-Dec.
Must sow: yes.
Enter name of crop: wheat.
Enter sowing density: 100.
Enter cultivar: ‘prodip.
Enter crop class: plant.
Enter row spacing: 250.
From the “Standard Toolbox” select “management” -> “Manager(common tasks)(Harvesting rule)” and drag onto the manager folder in your paddock. - Select ‘Manager folder’ -> ‘Harvesting rule’ to edit:
Enter name of crop to harvest when ripe: wheat. - From the “Standard Toolbox” select “management” -> “Manager(common tasks)(Fertilise at sowing)” and drag onto the manager folder in your paddock.
- Select Manager folder -> Fertilise at sowing to edit:
On which module should the event come from: wheat.
On which event: sowing.
Module used to apply fertiliser: Fertiliser.
Amount of starter fertiliser at sowing: 40.
Sowing fertiliser type: urea_N. - From the ‘Rice Management Toolbox’ select ‘Rice’ -> ‘Manager’ -> (Fertilise and Irrigate rabi crop) and drag onto the manager folder in your ‘paddock’.
- Select ‘Manager folder’ -> ‘Fertilise and Irrigate rabi crop’ to edit:
Crop type: wheat.
DAS to apply fertiliser: 20.
Module used to apply the fertiliser: Fertiliser.
Amount of fertiliser to apply: 30.
Fertiliser type: urea_N.
Amount of irrigation to apply: 60 - Add additional report variables:
Component Variable name Wheat biomass as wheat_biom yield as wheat_yield - Make a copy of Fertilise and Irrigate rabi crop by dragging it onto the Manager folder node.
- Select Manager folder -> Fertilise and Irrigate rabi crop1 to edit:
Change DAS to apply fertiliser: 40.
Change amount of fertiliser to apply: 30.
Fertiliser type: urea_N.
Amount of irrigation to apply: 60 - From the “Standard Toolbox” select “management” -> “Manager(common tasks)(Irrigate at sowing)” and drag onto the manager folder in your paddock.
- Select Manager folder -> Irrigate at sowing to edit:
The module the event come from: wheat.
. Which event should irrigation be applied: sowing.
Module used to apply irrigation: Irrigation.
Amount of irrigation to apply: 60. - From the “Rice Management Toolbox” select “Rice” -> “Manager (Rabi residue)” and drag onto the manager folder in your “paddock”.
- Select “Manager folder” -> “Rabi residue” to edit:
The module the event come from: wheat.
On which event should tillage be done: harvesting.
Module used to apply the tillage: Surface Organic Matter.
Tillage type: user_defined.
User_defined depth of seedbed preparation: 0.
User_defined fraction of surface residue to incorporate: 0.8. - Run the Rice-wheat simulation.
Graph date (X axis) vs total_biomass, rice_yield, wheat_yield and wheat_biom (Y axis). ( Hint: Use your XY Chart from the previous simulation and add the reporting variables selected for wheat)
Change the ‘title’ of your graph by renaming your ‘Chart’ to a more siutable name. (Hint: TAman rice-wheat rotation)
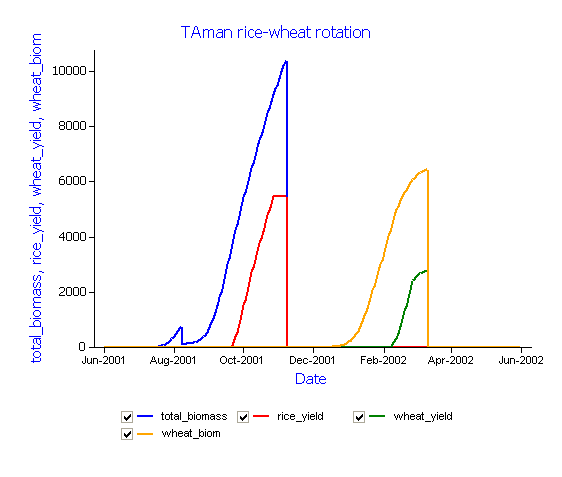
The above examples introduced a crop rotation or cropping sequence where two crops (rice and wheat) are grown in series over a single season. The previous exercises have only considered a 12 month period. In the next exercise you will evaluate a long-term scenario based on the rice-wheat simulation that you have created. Long-term simulations require a much longer climate record. The Bhola_1998-07.met file contains daily records from 1998 to 2007 and enables simulation of this cropping sequence over 9 years.
Long-term rice-wheat rotation
- Make a copy of ‘Rice-wheat’ by dragging it onto the ‘Simulations’ node.
- Rename the copy to Rice-wheat scenario.
- Select clock and change the start and end dates for the simulation:
Start date: 1/06/1998.
End date: 31/05/2007. - Run the Rice-wheat scenario simulation.
Evaluate the ‘XY Chart’ showing total biomass and yield of both wheat and rice.
Change the ‘title’ of your graph by renaming your ‘Chart’ to a more siutable name. (Hint: TAman rice-wheat scenario)
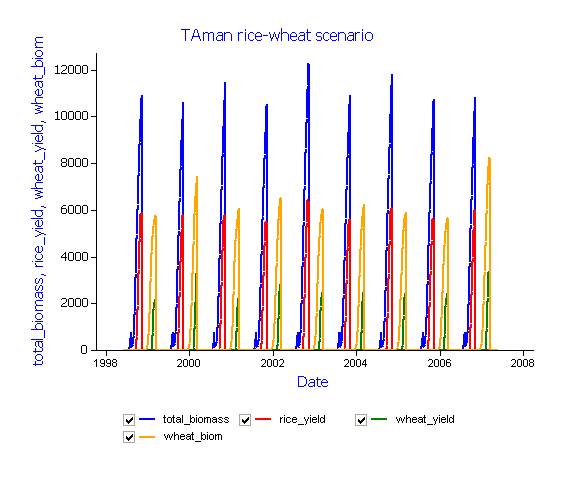
The above graph is an example of a simple “rice-wheat” rotation where crops are sown on fixed planting dates. In the following example you will evaluate the introduction of an opportunity crop into this long-term rotation. Opportunity crops rely on a particular event occuring that would enable a crop to be planted. A simple example of an event is “rainfall”. (ie. During a specified window of opportunity, did we get sufficient rainfall to enable a particular crop to be planted?)
Add an opportunity crop (ie.mungbean) to a long-term rice-wheat rotation
- Make a copy of ‘Rice-wheat scenario’ by dragging it onto the ‘Simulations’ node.
- Rename the copy to Rice-wheat-mungbean opportunity.
- From the ‘Standard Toolbox’ select ‘Crops’ -> ‘mungbean’ and drag onto the ‘paddock’ node. (You may want to reorder ‘mungbean’ to below the ‘wheat’ component) (Hint: Ctrl + up arrow)
- Make a copy of your ‘Sow using a variable rule’ in the ‘Manager folder’ by dragging it onto the Manager folder node. Rename the copy to ‘Sow mungbean’.
- Select ‘Sow mungbean’ for editing:
Enter sowing window START date: 20-Mar.
Enter sowing window END date: 7-Apr.
Must sow: No.
Amount of rainfall: 20.
Number of days of rainfall: 3.
Enter minimum allowable available soil water: 0.
Enter name of crop to sow: mungbean.
Enter sowing density: 45.
Enter sowing depth: 30.
Enter cultivar: berken.
Enter crop growth class: plant.
Enter row spacing: 250. - Make a copy of your ‘Harvesting rule’ in the ‘Manager folder’ by dragging it onto the Manager folder node. Rename the copy to ‘Harvesting mungbean’.
- Select ‘Harvesting mungbean’ for editing:
Enter name of crop to harvest: mungbean. - Change report variables:
Component Variable name Wheat biomass yield - Select the water node in your soil (Silt) for editing:
Make a copy of wheat by dragging it onto the water node. - Rename this copy to mungbean and select for editing:
Change “xf” values of 1 at 0-90 cm and 90-120cm and 120-150cm to 0. (This restricts potential rooting depth for mungbean to only 60cm) - Run the Rice-wheat-mungbean opportunity simulation.
Graph date (X axis) vs rice_yield, wheat.yield and mungbean.yield (Y axis). Rename the graph to ‘Rice-wheat-mungbean opportunity’ ( Hint: Edit the old XY Chart copied over from the previous simulation)
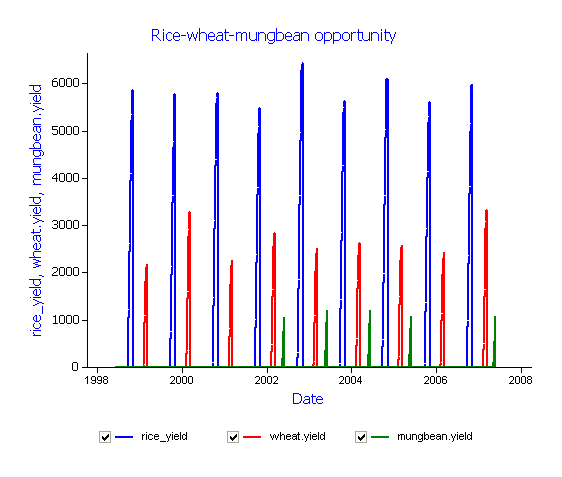
Question: How many years do you get a planting opportunity to sow mungbean?
The previous examples have demonstrated the process for constructing a simple cropping sequence or rotation (Rice-wheat) based on fixed sowing dates. The rice seedling nursery was sown on the 15th of July with transplanting occuring after 25 days. The wheat was sown on the 8th of December allowing time for the TAman rice harvest and well within the optimal planting window for wheat at “Bhola”. Mungbean was included in this simulation as an example of an opportunity crop. The sowing criteria required 20mm of rainfall to occur over a 3 day period if the crop was to be sown. As the graph shows, these conditions only occurred in 5 of the 9 years.
Additional exercise: Explore the effects of changing the “Sowing criteria” for mungbeans on the frequency of a successful mungbean crop.