
Configuring APSIM User Interface for a new model
The APSIM User Interface needs to be told about any new model.
For the purposes of this guide, we’ll assume that the Gross Margin model is being added the the User Interface.
Creating a Plugin XML file
The first step to telling the User Interface about GrossMargin is to create an XML plugin file that contains all the meta-data about the new model. This XML file contains pointers to icon files, documentation and a mechanism on how to create a .sim file to pass to APSIM.
<Type name="GrossMargin"> <MetaData> <UItype>VBUserInterface.GenericUI</UItype> <ShowInMainTree>Yes</ShowInMainTree> <Image>%apsim%\UserInterface\Images\banner2.jpg</Image> <Documentation>GrossMargin.htm</Documentation> <LargeIcon>%apsim%\UserInterface\Images\GrossMargin32.png</LargeIcon> <SmallIcon>%apsim%\UserInterface\Images\GrossMargin16.png</SmallIcon> <DLL>%apsim%/Model/GrossMargin.%dllext%</DLL> <drops> <drop>toolbox</drop> <drop>simulation</drop> <drop>folder</drop> </drops> <ApsimToSim> <component name="[GrossMargin.name]" executable="[dll]"> <executable name="[dll]" version="1.0" /> <initdata> [Model] [GrossMargin.innerxml] </initdata> </component> </ApsimToSim> </MetaData> <Model> <GrossMargin/> </Model></Type>
This plugin file points to many auxiliary files (png, html, jpg etc). It also tells the user interface which “UI” to use on the right hand side on the user interface. In this example, the GrossMargin component will use:
VBUserInterface.GenericUI
This particular UI is used by many models in APSIM. It simply interprets the XML chunk it finds in the .apsim file. To recap, the Gross Margin model has these parameters:
<Param()> Private NCost As Double = 0<Param()> Private NApplicationCost As Double = 0<Param()> Private WaterCost As Double = 0<Param()> Private Price As Double = 0<Param()> Private MinimumProtein As Double = 0<Param()> Private ProteinIncrement As Double = 0
This means the XML chunk in the .apsim file will look like this:
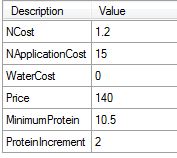
<GrossMargin> <NCost>1.2</NCost> <NApplicationCost>15</NApplicationCost> <WaterCost>0</WaterCost> <Price>140</Price> <MinimumProtein>10.5</MinimumProtein> <ProteinIncrement>2</ProteinIncrement></GrossMargin>
The GenericUI will display this XML like this:
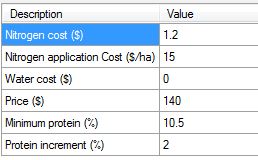
This can be improved by adding metadata to the XML chunk in the .apsim file:
<GrossMargin> <NCost type="text" description="Nitrogen cost ($)">1.2</NCost> <NApplicationCost type="text" description="Nitrogen application Cost ($/ha)">15</NApplicationCost> <WaterCost type="text" description="Water cost ($)">0</WaterCost> <Price type="text" description="Price ($)">140</Price> <MinimumProtein type="text" description="Minimum protein (%)">10.5</MinimumProtein> <ProteinIncrement type="text" description="Protein increment (%)">2</ProteinIncrement></GrossMargin>Now the GenericUI will look like this:
Telling the User Interface about the Plugin XML file
The next step is to let the User Interface know about this plugin XML file. This is best done by clicking “Options” in the User Interface, select the PlugIns tab and then click the “Add” link at the bottom of the window. You can then navigate to the plugin xml file.
Adding the Plugin XML file into the APSIM release
If the XML file is to be added to the release, the apsim.xml file in the root directory of APSIM should be modified like this:
<PlugIn enabled=”yes”>%apsim%/Model/GrossMargin.xml</PlugIn>
The user interface keeps a cache of the apsim.xml file in the user’s profile. To remove the cache and force the user interface to reload from the original apsim.xml file, click the ‘Options’ in the user interface and then click the ‘Revert all options’ button to remove the cached apsim.xml files in your %APPDATA%\Roaming\Apsim folder.
Once the apsim.xml file has been modified, it can be committed to version control.
Creating a toolbox
The next step is to create a toolbox so that the user can drag an XML chunk and drop it on their simulation. A toolbox is just another XML file and looks like this:
<folder name="GrossMargin toolbox"> <GrossMargin> <NCost type="text" description="Nitrogen cost ($)">1.2</NCost> <NApplicationCost type="text" description="Nitrogen application Cost ($/ha)">15</NApplicationCost> <WaterCost type="text" description="Water cost ($)">0</WaterCost> <Price type="text" description="Price ($)">140</Price> <MinimumProtein type="text" description="Minimum protein (%)">10.5</MinimumProtein> <ProteinIncrement type="text" description="Protein increment (%)">2</ProteinIncrement> </GrossMargin></folder>This toolbox XML file can then be given to the User Interface by clicking Options in the User Intface and then the “Add a toolbox” link at the bottom of the Options window.
Letting the User Interface discover the new model’s variables and events
To fully integrate the new model into the User Interface involves running UpdateDotNetProxies.exe from the %apsim%\Model directory. The User Interface will then probe the new model’s DLL (and all other APSIM DLL’s) and discover all of it’s variables and events and make them available to the user in the outputfile variables and reporting frequency lists.